.png)
Module 3: Project Coordinator - Create and Manage Documents for Signing
💡This article covers how to create a Customer Signoff form, generate it as a PDF, and send it out for an electronic signature then how to track and follow up on that signature request until it's signed.
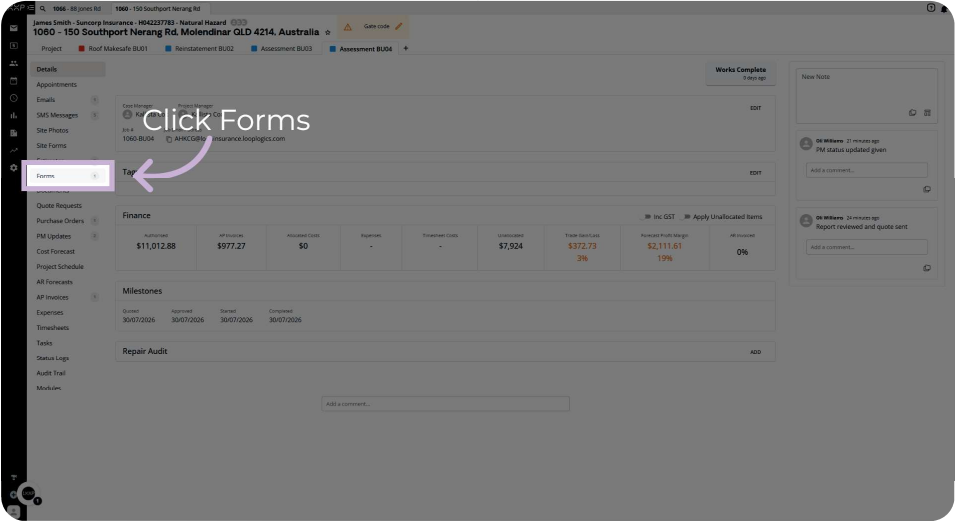
Step 1: Open Forms
From the job's module, click Forms in the left-hand menu.
Details:
- Sits among the module's other sections, alongside Site Forms, Estimates, and Documents
-
Any forms already created for the job (for example, a Scope of Works) are listed here
Step 2: Start a New Form
Click New Form, then click the Form Template field to see the available templates.

Details:
- Templates seen in this recording include A&G Assessment Report, Assessment Report, Customer Signoff, Initial Triage, Job Information Sheet, Photo Schedule, QBCC Level 1 Contract, QBCC Level 2 Contract, RACQ QCA Site Form, Restoration Report, Roof Report, Site Attendance, Test Checklist, and Water Damage Report

- A Reference field is also available on this screen
Step 3: Create the Customer Signoff Form
Click Customer Signoff from the template list, then click Create.

Details:
- Generates a new form pre-filled with the job's Claim Details (client name, reference, site address, claims administrator, and so on)
- Includes a Customer Sign-off section with a confirmation statement naming the customer, site address, and claim reference number

Step 4: Review and Save the Form
Review the form content, add any Notes, then click the checkmark to save your changes.
Details:
- The form is a rich text editor, so wording can be adjusted if needed before generating a PDF
- Saved changes are reflected immediately in the form

Step 5: Generate the PDF
Click Generate PDF to create a PDF version of the form.
Details:
- Other options on this toolbar include Preview, Clone, and Delete
- The generated PDF is what gets attached when you send the signature request

Step 6: Open Documents and Start a New Document
Click Documents in the left-hand menu, then click New Document.

Details:
- A dropdown menu appears with options including Request Signing
- Documents and Forms are separate sections, but a form's PDF becomes available to attach as a signable document here

Step 7: Request Signing
Click Request Signing, select the Signature Request email template, then tick the document(s) you want signed under Signable Documents.

Details:
- Signable Documents lists forms like Customer Signoff that can be sent for signature
- Supporting Documents (for example, Invoices) can be included alongside the signable document without requiring a signature themselves
- The Primary Contact, Case Manager, and Customer Contact are shown so you can confirm who the request is going to


Step 8: Send the Signature Request
Click Send Request.
Details:
- The request is emailed to the customer contact shown in the dialog
- Once sent, the request appears in the job's Signing Requests list

Step 9: Track the Signing Request
At the project level, click Signing Requests to see all pending and completed requests across the project's jobs.


Details:
- Each request shows its reference (for example, "1060-BU04_CUSTOMER_SIGNOFF"), who the signature is required from, and who requested it
- Click Send Reminder on a pending request to prompt the recipient to complete it

Step 10: Review Request Details and the Signed Document
Click a signing request to see its full timeline, then click Signed Document once it's been signed.


Details:
- The timeline shows each stage: sent, reminded, viewed, and signed, each with its own timestamp
- Signed Document opens the final signed version for your records

Summary
Key Documents for Signing Steps:
Creating the Form:
- Open Forms, start a New Form, and choose the Customer Signoff template
-
Review and save the form, then Generate PDF
Sending for Signature:
- Open Documents, click New Document, then Request Signing
-
Tick the signable document(s), confirm the contacts, and Send Request
Tracking It:
- Use the project-level Signing Requests list to see pending and completed requests
-
Send Reminder if needed, and open Signed Document once it's complete
Key Points to Remember:
- A form has to be generated as a PDF before it can be sent out as a signable document
- Supporting Documents (like Invoices) can ride along with a signable document without needing their own signature
- The signing request timeline records every stage — sent, reminded, viewed, and signed — with timestamps, so you always know where a request stands
👇Recap
- You've learned how to create a Customer Signoff form from a template and generate it as a PDF.
- You've requested a signature on that document, confirming the contacts and attaching any supporting documents.
- You've tracked the signing request through to completion and opened the final signed document.
🙅♂️ Common mistakes to avoid: forgetting to click Generate PDF before trying to send a form out for signature, or sending a reminder without first checking the request's timeline to see if it's already been viewed or signed.
🏆 What good looks like: checking the Signing Requests list regularly so a pending signature doesn't sit unnoticed, and sending a reminder as soon as it's clearly needed rather than waiting indefinitely.
FAQ
Where do I find the Customer Signoff template? Open Forms, click New Form, then click the Form Template field, Customer Signoff is one of the templates listed.
Can I send more than one document for signature at once? Yes, Signable Documents and Supporting Documents can both be included in the same Request Signing dialog; only the signable ones require an actual signature.
How do I check if a customer has seen or signed a document yet? Open Signing Requests at the project level and click the request to see its full timeline, sent, reminded, viewed, and signed, each with a timestamp.
What if the customer hasn't signed after a while? Click Send Reminder on the pending request from the Signing Requests list.
❓ Need Help?
If you have questions or need assistance, use the chat box in the bottom-right corner to contact the Loop Logics support team or email support@looplogics.com
👉 Continue your learning, next step is to move onto Module 4: Project Coordinator - Upload and Manage Site Photos to continue.