.png)
Module 1: Project Coordinator - Creating a Purchase Order from an Estimate
💡This article covers how to create a purchase order directly from a job's authorised estimate and send it to a subcontractor. Raising a purchase order this way keeps the subcontractor's scope, pricing, and schedule all tied back to the same approved estimate line items.
Step 1: Open the Job Module
From the job, click the module tab for the work you're raising a purchase order against (for example, an Assessment or Reinstatement module).
Details:
- A job can have several modules open at once, shown as tabs along the top (for example, Roof Makesafe, Reinstatement, Assessment)
- Switching modules changes which estimate and purchase orders you're working with

Step 2: Open Purchase Orders
In the module's left-hand menu, click Purchase Orders.
Details:
- Sits among the module's other sections, such as Estimates, Forms, Documents, and Quote Requests
- If no purchase order has been raised yet, the screen shows "No purchase orders for this job yet"

Step 3: Start a New Purchase Order
Click New Purchase Order.
Details:
- Opens a selection screen listing the estimate's cost centres (for example, Carpentry, Painting, Plastering, Electrical)
- Each cost centre can be included or excluded using its checkbox

Step 4: Select Cost Centres and a Price Method
Tick the cost centre(s) you want to include (for example, Carpentry), then click Do & Charge, Price by Cost Centre, or Price by Line Item at the bottom of the screen.
Details:
- Cost centres available in this recording were Carpentry, Painting, Plastering, and Electrical, click the arrow next to a cost centre to expand it and see its individual scope line items
- Expand All / Collapse All buttons at the top help you review everything before ticking
- The pricing method you choose determines how the next screen (Purchase Order Amounts) lays out the line items

Step 5: Confirm the Purchase Order Amounts
Review the Purchase Order Amounts screen, adjusting quantities, rates, or the discount slider as needed, then click Next.
Details:
- Each line item shows its Material and Labour quantities and rates, with a running Total
- A discount slider along the bottom lets you reduce the authorised amount by a percentage, which recalculates the Sub Total, GST, and Total
- Click Save as Draft instead of Next if you want to come back to this purchase order later

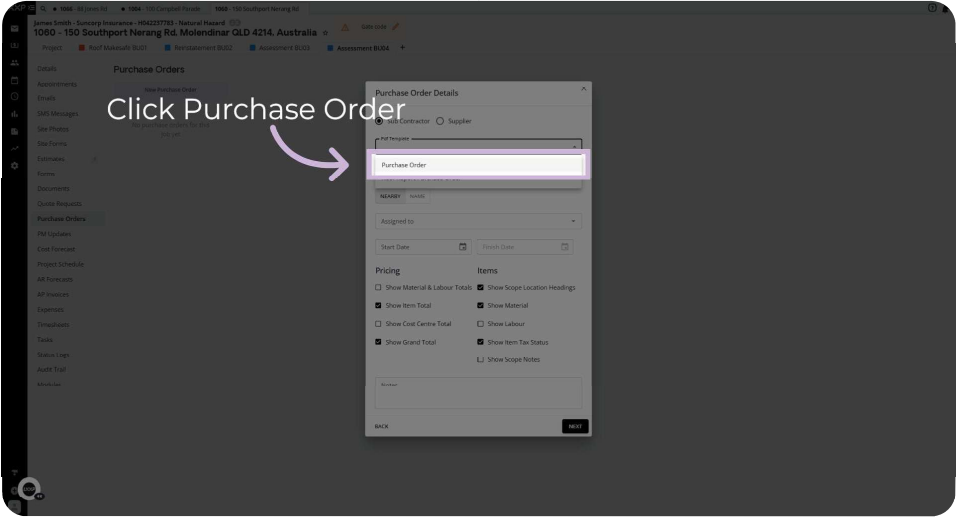
Step 6: Set the Purchase Order Details
Choose Sub Contractor or Supplier, select a PDF Template and Email Template, then click Assigned to to choose who the purchase order goes to.
Details:
- The Assigned to search has Nearby and Name tabs to help locate the right subcontractor or supplier
- Subcontractors in this recording were shown with a (Not Compliant) label next to their name — this didn't stop one from being selected and sent to, so it's worth checking what that label means for your own workflow before assigning work to a non-compliant subcontractor
-
Tick Skip next to Email Template if you don't want to send an email with this purchase order
Step 7: Set the Schedule and Document Options
Set the Start Date and Finish Date, then review the Pricing and Items checkboxes before clicking Next.
Details:
- Pricing options include Show Material & Labour Totals, Show Item Total, Show Cost Centre Total, and Show Grand Total
- Items options include Show Scope Location Headings, Show Material, Show Labour, Show Item Tax Status, and Show Scope Notes
- A Notes field is available for anything you want to add to the purchase order document


Step 8: Preview the Purchase Order
Review the generated PDF preview, which includes the order details, a QR code, and the itemised scope and totals, then click Next.
Details:
- The PDF shows the order number, project manager and case manager details, customer details, site address, and the full cost breakdown
- The QR code links to a site risk assessment the subcontractor is asked to complete before starting work
- A second page carries the purchase order's terms and conditions

Step 9: Send the Purchase Order
Review the pre-filled Compose Message email, then click Send.
Details:
- The email includes a link to the risk assessment (or the QR code on the PDF) and a separate link for the subcontractor to submit their invoice, photos, and/or report
- The subcontractor's email address autofills based on who you assigned the purchase order to
- The purchase order's PDF is attached automatically

Step 10: Finish Up
Click Done on the "Purchase Order Sent" confirmation.
Details:
- The purchase order now appears under Sub Contractors (or Suppliers) in the Purchase Orders list, showing its reference number, assignee, status, and date
- The purchase order is also saved to the job's Documents folder

Summary
Key Purchase Order Steps:
Starting the Purchase Order:
- Open the relevant module, then Purchase Orders, then New Purchase Order
-
Select the cost centre(s) and scope items, and choose a pricing method
Setting It Up:
- Confirm the amounts (and apply a discount if needed) before clicking Next
- Choose Sub Contractor or Supplier, select templates, and assign who it's going to
-
Set the Start and Finish Date, and review the Pricing/Items options
Sending It:
- Preview the PDF, then send the pre-filled email
-
Click Done once it's sent, it's saved to Documents and listed under Purchase Orders
Key Points to Remember:
- A purchase order is built from the job's authorised estimate, so the pricing ties back to approved scope items
- Subcontractors can show a "(Not Compliant)" label in the Assigned to list, this is still selectable, so check what that status means before sending work to one
- The email sent to the subcontractor includes links for the pre-work risk assessment and for submitting their invoice and photos afterward
👇Recap
- You've learned how to open Purchase Orders within a job module and start a new purchase order From Scope.
- You've selected a cost centre and pricing method, confirmed the amounts, and set the purchase order's details, schedule, and document options.
- You've previewed and sent the purchase order, and confirmed where it ends up afterward.
🙅♂️Common mistakes to avoid: assigning a purchase order to a subcontractor flagged "(Not Compliant)" without checking why, or skipping the PDF preview and missing a pricing or scope mistake before it's sent.
🥇What good looks like: reviewing the Purchase Order Amounts and PDF preview carefully before sending, so the subcontractor receives accurate scope, pricing, and schedule information the first time.
FAQ
Where do I find Purchase Orders for a job? Open the relevant module and click Purchase Orders in the left-hand menu.
Can I send a purchase order without an email? Yes, tick Skip next to the Email Template option in the Purchase Order Details step.
What does "(Not Compliant)" mean next to a subcontractor's name? This recording didn't show what triggers that label or what it's meant to prevent, it's shown next to a subcontractor's name in the Assigned to list, but doesn't stop you from selecting and sending a purchase order to them. Worth checking your own compliance process before assigning work to a flagged subcontractor.
Where does a purchase order go once it's sent? It's saved to the job's Documents folder and listed under Sub Contractors or Suppliers in the Purchase Orders section, showing its reference number and status.
❓ Need Help?
If you have questions or need assistance, use the chat box in the bottom-right corner to contact the Loop Logics support team or email support@looplogics.com
👉 Continue your learning, next step is to move onto Module 2: Project Coordinator - SMS Communication to continue.